
So, there is a ton of misinformation regarding how to upgrade your Surface Pro Windows 8.1 Pro system to Windows 8.1 Enterprise. This post should put to bed some of that and show you the steps to reinstall (not upgrade) your Surface Pro 3 and get some of those cool features Enterprise edition gives you.
In my case, the reason for the upgrade was simple. Microsoft DirectAccess. The ability to seamlessly connect into the office network without VPN and all the trouble that causes!
The steps below will keep your recovery partitions intact. I chose this as I didn’t fancy being stuck on the other side of the world and not being able to quickly recover if the worst happened. You could of course blow away all the partitions, but I didn’t test that!
Lastly. A lot of posts around the internet suggest you have to turn off secure boot to install Windows 8.1 Enterprise. This is not true. You simply need the right tools.
1. Download Rufus and create a USB Key.
Rufus is an amazing tool. Hands down beats every other ISO to USB boot tool I have come across. Better yet, its built in Ireland!
Once you have it downloaded, and you have your Windows 8.1 Enterprise ISO, you need to create a USB key (8GB or more) with the following settings:
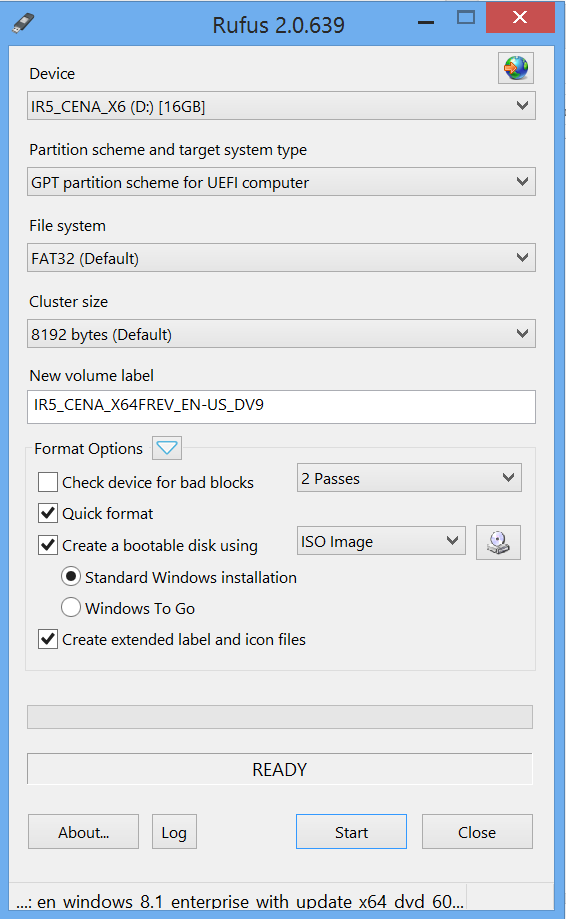
GPT partition scheme for UEFI computer
FAT32
Cluster: 8192 bytes
Standard Windows Installation
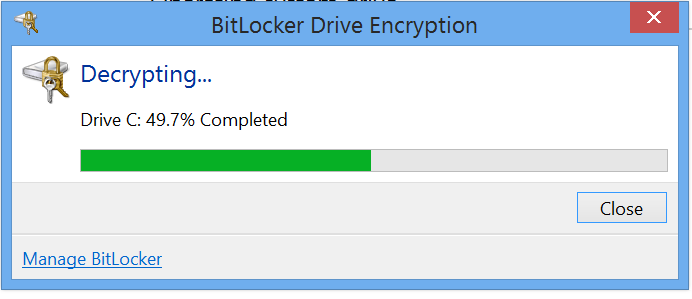
2. Bitlocker off!
In your control panel, disable Bitlocker on your C: drive and wait for it to finish.
3. Did you back everything up?
What you are about to do is delete your Windows installation and start fresh. Did you backup your stuff? Check and check again!
4. Get the drivers ready before you start.9
Click here and download the Surface Pro 3 Driver pack. (You don’t need the other versions). Put this on your USB key.
5. Boot your Surface off the USB Key.
To boot the Surface Pro 3 off the USB key, you first shutdown your surface. Then, hold the volume down button, and tap the power button once. Keep the volume down button pressed until the SURFACE logo appears, then release. This should make the device boot off the USB key.
6. Don’t kill your recovery mojo!
During the install, you do not want to blow away your partitions when asked. Hence the reason we wanted to decrypt the drive earlier in this process. So, by default, you select Drive 0, Partition 4 as the install location….. FORMAT this partition (and not the others), then install there…. Excuse the pic!

7. Install the Surface Pro 3 Driver Packs.
After you are in Windows. Go ahead and install the Surface Pro Driver Pack file you downloaded earlier.
8. Bitlocker ON
Go ahead now and turn back on bitlocker on the C Drive to secure that down.
Now you are good to go! Enjoy!
Hi. Thanks for this! 🙂
Any idea if the process is the same for the newer Surface 3 (the non-pro version)?